 Featured
Windows 8 Could Have Nine Different Backgrounds and Editions
 Featured
Don't miss these 10 Things if you are going for Picnic.
 Articles
iPhone 6 Will Look Like
 Articles
Solar Powered UAVs To Replace Satellites
Friday, 15 January 2016
Need for Speed Most Wanted 2012 Gameplay (PC HD) Tool Booth Bounty
Posted at Friday, January 15, 2016 | in Need for Speed Most Wanted 2012 Gameplay
|
Read More»
Need for Speed Most Wanted 2012 Gameplay (PC HD) Tool Booth Pursuit Evasion
Posted at Friday, January 15, 2016 | in Need for Speed Most Wanted 2012 Gameplay
|
Read More»
Need for Speed Most Wanted 2012 Gameplay (PC HD) Tool Booth Pursuit Duration
Posted at Friday, January 15, 2016 | in Need for Speed Most Wanted 2012 Gameplay
|
Read More»
Need for Speed Most Wanted 2012 Gameplay (PC HD) Tool Booth Road Block
Posted at Friday, January 15, 2016 | in Need for Speed Most Wanted 2012 Gameplay
|
Read More»
Tuesday, 14 July 2015
How to hide drive in windows
How to hide drive in windows
Posted at Tuesday, July 14, 2015 | in windows
|
Read More»
How to hide drive in windows
Sunday, 9 March 2014
How do I install TeamViewer on my Linux distribution?
Graphical installation
For installing TeamViewer, we recommend using the graphical installer. The graphical installer can be invoked by (double) clicking the downloaded package.
If this is not the case and, e.g. the Archive Manager opens up, open the context menu instead (right-click on the downloaded package). Depending on your distribution you will get different possibilities to install the package, e.g. “Open with software installation”, “Open with GDebi package installer”, “Open with Ubuntu Software Center”, or “Open with> QApt package installer”.
RedHat, CentOS, Fedora, SUSE
You need the teamviewer_linux.rpm package.
For installing TeamViewer, we recommend using the graphical installer.
If you prefer to use the command line or if there is no graphical installer available you can use either one of these commands:
yum install teamviewer_linux.rpm(recommended, as it will install missing dependencies)rpm -i teamviewer_linux.rpm
In case “yum” is asking for a missing public key, you can download it here and import the key by using following command:
rpm --import TeamViewer_Linux_PubKey.asc
After importing the public key, please execute the “yum”-command again to install the TeamViewer rpm.
Debian, Mint, Ubuntu, Kubuntu, Xubuntu…
For 32-bit DEB-systems you need the teamviewer_linux.deb package.
For 64-bit DEB-systems without Multiarch you need the teamviewer_linux_x64.deb package. Please see note onMultiarch below.
For installing TeamViewer, we recommend using the graphical installer.
If you prefer to use the command line or if there is no graphical installer available you can use either one of these commands:
For the 32-bit package:
sudo dpkg -i teamviewer_linux.deb
For the 64-bit package:
sudo dpkg -i teamviewer_linux_x64.deb
In case “dpkg” indicates missing dependencies, complete the installation by executing the following command:
sudo apt-get install -f
Notes to Multiarch:
On newer 64-bit DEB-systems with Multiarch-support (Debian 7) teamviewer_linux_x64.deb cannot be installed because the package ia32-libs is not available anymore on these systems. In this case you can useteamviewer_linux.deb instead.
In case you get the error “wrong architecture i386” you have to execute the following command lines:
dpkg --add-architecture i386apt-get update
For further information: http://wiki.debian.org/Multiarch/HOWTO
Other platforms
TeamViewer does also run on a lot of other distributions, although not officially supported.
You can use our tar.gz package which will only create files in the directory where you extract it to. The tar.gz package works, if the libraries that TeamViewer depends on are installed which is often the case.
On Mandriva/Mageia TeamViewer can be installed using the following command:
urpmi --force --allow-nodeps teamviewer_linux.rpm
On PCLinuxOS TeamViewer can be installed from the repository. The package is provided by the PCLinuxOS team.
Run TeamViewer without installation
The tar.gz package can be run without installation and doesn’t even need root permissions.
After downloading the tar.gz package, you need to extract it to the directory you want to run it from. Simply click on “teamviewer” to start a TeamViewer instance.
The tar.gz package works, if the libraries TeamViewer depends on are installed which is often the case.
You can identify missing libraries by running the command:
tv-setup --checklibs
How do I install TeamViewer on my Linux distribution?
Posted at Sunday, March 09, 2014 | in LINUX
|
Read More»
How do I install TeamViewer on my Linux distribution?
Graphical installation
For installing TeamViewer, we recommend using the graphical installer. The graphical installer can be invoked by (double) clicking the downloaded package.
If this is not the case and, e.g. the Archive Manager opens up, open the context menu instead (right-click on the downloaded package). Depending on your distribution you will get different possibilities to install the package, e.g. “Open with software installation”, “Open with GDebi package installer”, “Open with Ubuntu Software Center”, or “Open with> QApt package installer”.
RedHat, CentOS, Fedora, SUSE
You need the teamviewer_linux.rpm package.
For installing TeamViewer, we recommend using the graphical installer.
If you prefer to use the command line or if there is no graphical installer available you can use either one of these commands:
yum install teamviewer_linux.rpm(recommended, as it will install missing dependencies)rpm -i teamviewer_linux.rpm
In case “yum” is asking for a missing public key, you can download it here and import the key by using following command:
rpm --import TeamViewer_Linux_PubKey.asc
After importing the public key, please execute the “yum”-command again to install the TeamViewer rpm.
Debian, Mint, Ubuntu, Kubuntu, Xubuntu…
For 32-bit DEB-systems you need the teamviewer_linux.deb package.
For 64-bit DEB-systems without Multiarch you need the teamviewer_linux_x64.deb package. Please see note onMultiarch below.
For installing TeamViewer, we recommend using the graphical installer.
If you prefer to use the command line or if there is no graphical installer available you can use either one of these commands:
For the 32-bit package:
sudo dpkg -i teamviewer_linux.deb
For the 64-bit package:
sudo dpkg -i teamviewer_linux_x64.deb
In case “dpkg” indicates missing dependencies, complete the installation by executing the following command:
sudo apt-get install -f
Notes to Multiarch:
On newer 64-bit DEB-systems with Multiarch-support (Debian 7) teamviewer_linux_x64.deb cannot be installed because the package ia32-libs is not available anymore on these systems. In this case you can useteamviewer_linux.deb instead.
In case you get the error “wrong architecture i386” you have to execute the following command lines:
dpkg --add-architecture i386apt-get update
For further information: http://wiki.debian.org/Multiarch/HOWTO
Other platforms
TeamViewer does also run on a lot of other distributions, although not officially supported.
You can use our tar.gz package which will only create files in the directory where you extract it to. The tar.gz package works, if the libraries that TeamViewer depends on are installed which is often the case.
On Mandriva/Mageia TeamViewer can be installed using the following command:
urpmi --force --allow-nodeps teamviewer_linux.rpm
On PCLinuxOS TeamViewer can be installed from the repository. The package is provided by the PCLinuxOS team.
Run TeamViewer without installation
The tar.gz package can be run without installation and doesn’t even need root permissions.
After downloading the tar.gz package, you need to extract it to the directory you want to run it from. Simply click on “teamviewer” to start a TeamViewer instance.
The tar.gz package works, if the libraries TeamViewer depends on are installed which is often the case.
You can identify missing libraries by running the command:
tv-setup --checklibs
Sunday, 12 January 2014
Media Monkey V 4.0 downlode
Media monkey Media Monkey V 4.0 key
name: serial: INF0HW2M0D3DK0YXJH0VN45
Media monkey Media Monkey V 4.0 key
name: serial: INF0HW2M0D3DK0YXJH0VN45
Media monkey
Posted at Sunday, January 12, 2014 | in HACKING
|
Read More»
Media Monkey V 4.0 downlode
Media monkey Media Monkey V 4.0 key
name: serial: INF0HW2M0D3DK0YXJH0VN45
Media monkey Media Monkey V 4.0 key
name: serial: INF0HW2M0D3DK0YXJH0VN45
Sunday, 1 September 2013
MemTest86 is a free, thorough, stand alone memory test for x86 architecture computers.

 |
There are many good approaches for testing memory. However, many tests simply throw some patterns at memory without much thought or knowledge of memory architecture or how errors can best be detected. This works fine for hard memory failures but does little to find intermittent errors. BIOS based memory tests are useless for finding intermittent memory errors.
RAM chips consist of a large array of tightly packed memory cells, one for each bit of data. The vast majority of the intermittent failures are a result of interaction between these memory cells. Often writing a memory cell can cause one of the adjacent cells to be written with the same data. An effective memory test attempts to test for this condition. Therefore, an ideal strategy for testing memory would be the following:
- Write a cell with a zero.
- Write all of the adjacent cells with a one, one or more times.
- Check that the first cell still has a zero.
It should be obvious that this strategy requires an exact knowledge of how the memory cells are laid out on the chip. In addition there are a never ending number of possible chip layouts for different chip types and manufacturers making this strategy impractical. However, there are testing algorithms that can approximate this ideal and MemTest86does just this.
History
MemTest86 was originally developed by Chris Brady with a first release in 1994. However, some of the testing algorithms used have been under development since 1981 and have been previously implemented on Dec PDP-11, VAX-11/780 and Cray XMP architectures. Since then there has been more than a dozen new versions being released. Support for 64bit, new CPU types, symmetrical multiprocessors and many other features have been added during this period. In Feb 2013, PassMark Software took over the maintenance of the project from Chris. We have recently added an option to purchase a pre-made USB flash drive and also created a support forum where users can discuss issues. The MemTest86 code remains open source.
 Download MemTest86
 Purchase MemTest86
Using MemTest86™
 MemTest86 boot screen |
 MemTest86 configuration menu |
 Testing memory with MemTest86 |
 MemTest86 error summary |
 Bootable MemTest86 CD |
 Bootable MemTest86 USB Flash Drive (UFD) Note: USB manufacturer may vary. |
How to Test PC Ram with MemTest86
Posted at Sunday, September 01, 2013 | in INTERNET
|
Read More»
MemTest86 is a free, thorough, stand alone memory test for x86 architecture computers.
|
There are many good approaches for testing memory. However, many tests simply throw some patterns at memory without much thought or knowledge of memory architecture or how errors can best be detected. This works fine for hard memory failures but does little to find intermittent errors. BIOS based memory tests are useless for finding intermittent memory errors.
RAM chips consist of a large array of tightly packed memory cells, one for each bit of data. The vast majority of the intermittent failures are a result of interaction between these memory cells. Often writing a memory cell can cause one of the adjacent cells to be written with the same data. An effective memory test attempts to test for this condition. Therefore, an ideal strategy for testing memory would be the following:
- Write a cell with a zero.
- Write all of the adjacent cells with a one, one or more times.
- Check that the first cell still has a zero.
It should be obvious that this strategy requires an exact knowledge of how the memory cells are laid out on the chip. In addition there are a never ending number of possible chip layouts for different chip types and manufacturers making this strategy impractical. However, there are testing algorithms that can approximate this ideal and MemTest86does just this.
History
MemTest86 was originally developed by Chris Brady with a first release in 1994. However, some of the testing algorithms used have been under development since 1981 and have been previously implemented on Dec PDP-11, VAX-11/780 and Cray XMP architectures. Since then there has been more than a dozen new versions being released. Support for 64bit, new CPU types, symmetrical multiprocessors and many other features have been added during this period. In Feb 2013, PassMark Software took over the maintenance of the project from Chris. We have recently added an option to purchase a pre-made USB flash drive and also created a support forum where users can discuss issues. The MemTest86 code remains open source.
Using MemTest86™
MemTest86 boot screen |
MemTest86 configuration menu |
Testing memory with MemTest86 |
MemTest86 error summary |
Bootable MemTest86 CD |
Bootable MemTest86 USB Flash Drive (UFD) Note: USB manufacturer may vary. |
Friday, 23 August 2013
How to get free recharge
Play Quiz and Get Free Recharge. Invite your friends and earn Free recharge. Get Free online...
http://www.kuizr.com/entry.action?rid=2Rcu2l6%2F0SMeSpFaNQvkAbHDfSesgW%2FBbIbpmTcKuJg%3D
step 1:- Click on given link.
step 2:- fill up form.
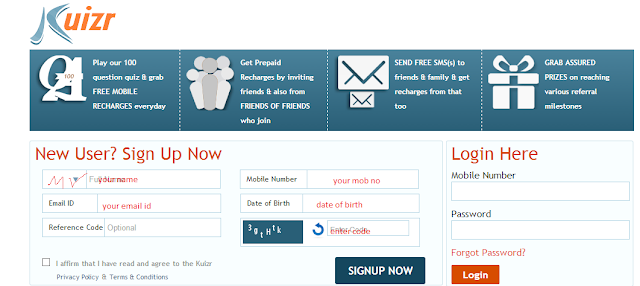
Play Quiz and Get Free Recharge. Invite your friends and earn Free recharge. Get Free online...
http://www.kuizr.com/entry.action?rid=2Rcu2l6%2F0SMeSpFaNQvkAbHDfSesgW%2FBbIbpmTcKuJg%3D
step 1:- Click on given link.
step 2:- fill up form.
step 3:- Now you get user id and password on your mob no.
step 4:- Now you login with your mob no and password.
step 5:- Now click on PLAY QUIZ
Play quiz and earn money
How to get free recharge
Posted at Friday, August 23, 2013 | in HACKING
|
Read More»
How to get free recharge
Play Quiz and Get Free Recharge. Invite your friends and earn Free recharge. Get Free online...
http://www.kuizr.com/entry.action?rid=2Rcu2l6%2F0SMeSpFaNQvkAbHDfSesgW%2FBbIbpmTcKuJg%3D
step 1:- Click on given link.
step 2:- fill up form.
Play Quiz and Get Free Recharge. Invite your friends and earn Free recharge. Get Free online...
http://www.kuizr.com/entry.action?rid=2Rcu2l6%2F0SMeSpFaNQvkAbHDfSesgW%2FBbIbpmTcKuJg%3D
step 1:- Click on given link.
step 2:- fill up form.
step 3:- Now you get user id and password on your mob no.
step 4:- Now you login with your mob no and password.
step 5:- Now click on PLAY QUIZ
Play quiz and earn money
Tuesday, 6 August 2013
How to install Android(JellyBeen) On Pc/Laptop
Things You Needed:-
1.Oracle VM VirtualBox
2.Android x86 4.2 Image
Instructions:
1.Install VirtualBox on your PC
2.Open VirtualBox and select New. In the dialog box enter the name as your wish and select
i)Type : Linux
ii)Version : Other Linux and select Next
3.In the next dialog box enter the memory size as your wish
Note:-Minimum 512Mb required for JellyBean
and select Next
4.In the next dialog box select create a virtual hard drive now. Then select VDI and select fixed or
dynamically allocated as your wish and create the
virtual drive
5.Select Virtual device and select settings, a dialog box appears. In the dialog box select i)Storage->Storage Tree->Empty
ii)In the attributes section select the Android 4.2 iso file you downloaded and check
Live Cd/Dvd, then click Ok
6.Then start the virtual device. In the screen select Install Android-x86 to hard disk.
7.In the next screen select Create/Modify Partition.
8.Then create a new primary bootable partition and select write. After finishing writing select quit.
9.Then install android in sda1 and select type as ext3 , choose yes for installing grub.
10.After installing remove live iso from VirtualBox and reboot. Now you can boot into Android 4.2.2.
Download Android x86 4.2 Image Size = 243.38MB
Download Oracle VM VirtualBox Size = 95.15MB
Things You Needed:-
1.Oracle VM VirtualBox
2.Android x86 4.2 Image
Instructions:
1.Install VirtualBox on your PC
2.Open VirtualBox and select New. In the dialog box enter the name as your wish and select
i)Type : Linux
ii)Version : Other Linux and select Next
3.In the next dialog box enter the memory size as your wish
Note:-Minimum 512Mb required for JellyBean
and select Next
4.In the next dialog box select create a virtual hard drive now. Then select VDI and select fixed or
dynamically allocated as your wish and create the
virtual drive
5.Select Virtual device and select settings, a dialog box appears. In the dialog box select i)Storage->Storage Tree->Empty
ii)In the attributes section select the Android 4.2 iso file you downloaded and check
Live Cd/Dvd, then click Ok
6.Then start the virtual device. In the screen select Install Android-x86 to hard disk.
7.In the next screen select Create/Modify Partition.
8.Then create a new primary bootable partition and select write. After finishing writing select quit.
9.Then install android in sda1 and select type as ext3 , choose yes for installing grub.
10.After installing remove live iso from VirtualBox and reboot. Now you can boot into Android 4.2.2.
Download Android x86 4.2 Image Size = 243.38MB
Download Oracle VM VirtualBox Size = 95.15MB
How to install Android(JellyBeen) On Pc/Laptop
Posted at Tuesday, August 06, 2013 | in computer
|
Read More»
How to install Android(JellyBeen) On Pc/Laptop
Things You Needed:-
1.Oracle VM VirtualBox
2.Android x86 4.2 Image
Instructions:
1.Install VirtualBox on your PC
2.Open VirtualBox and select New. In the dialog box enter the name as your wish and select
i)Type : Linux
ii)Version : Other Linux and select Next
3.In the next dialog box enter the memory size as your wish
Note:-Minimum 512Mb required for JellyBean
and select Next
4.In the next dialog box select create a virtual hard drive now. Then select VDI and select fixed or
dynamically allocated as your wish and create the
virtual drive
5.Select Virtual device and select settings, a dialog box appears. In the dialog box select i)Storage->Storage Tree->Empty
ii)In the attributes section select the Android 4.2 iso file you downloaded and check
Live Cd/Dvd, then click Ok
6.Then start the virtual device. In the screen select Install Android-x86 to hard disk.
7.In the next screen select Create/Modify Partition.
8.Then create a new primary bootable partition and select write. After finishing writing select quit.
9.Then install android in sda1 and select type as ext3 , choose yes for installing grub.
10.After installing remove live iso from VirtualBox and reboot. Now you can boot into Android 4.2.2.
Download Android x86 4.2 Image Size = 243.38MB
Download Oracle VM VirtualBox Size = 95.15MB
Things You Needed:-
1.Oracle VM VirtualBox
2.Android x86 4.2 Image
Instructions:
1.Install VirtualBox on your PC
2.Open VirtualBox and select New. In the dialog box enter the name as your wish and select
i)Type : Linux
ii)Version : Other Linux and select Next
3.In the next dialog box enter the memory size as your wish
Note:-Minimum 512Mb required for JellyBean
and select Next
4.In the next dialog box select create a virtual hard drive now. Then select VDI and select fixed or
dynamically allocated as your wish and create the
virtual drive
5.Select Virtual device and select settings, a dialog box appears. In the dialog box select i)Storage->Storage Tree->Empty
ii)In the attributes section select the Android 4.2 iso file you downloaded and check
Live Cd/Dvd, then click Ok
6.Then start the virtual device. In the screen select Install Android-x86 to hard disk.
7.In the next screen select Create/Modify Partition.
8.Then create a new primary bootable partition and select write. After finishing writing select quit.
9.Then install android in sda1 and select type as ext3 , choose yes for installing grub.
10.After installing remove live iso from VirtualBox and reboot. Now you can boot into Android 4.2.2.
Download Android x86 4.2 Image Size = 243.38MB
Download Oracle VM VirtualBox Size = 95.15MB
Popular Posts
-
 You can change your Windows Startup Sounds
-
 RFI: remote file inclusion
-
How to Watch Security Camera Streams on the Internet
-
connectify hotspot cracked with keygen free download
-
 MAC Spoofing How to Change MAC Address with SMAC !
-
This book will give you information on different concepts of hacking like cracking wireless network,hacking cell phone and many more. Below is the full list of hacking topics included in this book.
-
Happy NewYear 2013 Facebook Greeting and smileys
-
Creating Your Own Google Dorks And Find Vulnerability In Website
-
 bitdefender total security 2013 for 65 years Crack
-
 GET IP ADDRESS OF ANY USER WITH PHP SCRIPT


