• Featured

    Windows 8 Could Have Nine Different Backgrounds and Editions

  • Featured

    Don't miss these 10 Things if you are going for Picnic.

  • Articles

    iPhone 6 Will Look Like

  • Articles

    Solar Powered UAVs To Replace Satellites

  • Wednesday, 7 November 2012

    Facebook emoticons  

    [[471830866191622]] [[471830859524956]] [[471830869524955]] [[471830872858288]]
    [[471830862858289]] [[471830939524948]] [[471830936191615]] [[471830942858281]]
    [[471830932858282]] [[471830946191614]] [[471831016191607]] [[471831006191608]]
    [[471831019524940]] [[471831012858274]] [[471831009524941]] [[471831079524934]]


    [[492107567489997]] [[492107560823331]] [[492107564156664]] [[492107557489998]]
    [[492107554156665]] [[492107640823323]] [[492107644156656]] [[492107630823324]]
    [[492107637489990]] [[492107634156657]] [[492107734156647]] [[492107724156648]]
    [[492107727489981]] [[492107737489980]] [[492107730823314]] [[492107804156640]]


    [[487653724598553]] [[487653721265220]] [[487653717931887]] [[487653731265219]]
    [[487653727931886]] [[487653791265213]] [[487653797931879]] [[487653801265212]]
    [[487653804598545]] [[487653794598546]] [[487653867931872]] [[487653874598538]]
    [[487653864598539]] [[487653861265206]] [[487653871265205]] [[487653931265199]]


    [[455109547867974]] [[455109554534640]] [[455109557867973]] [[455109551201307]]
    [[455109561201306]] [[455109631201299]] [[455109637867965]] [[455109641201298]]
    [[455109634534632]] [[455109644534631]] [[455109714534624]] [[455109727867956]]
    [[455109721201290]] [[455109724534623]] [[455109717867957]] [[455109791201283]]


    [[455050754540520]] [[455050761207186]] [[455050764540519]] [[455050757873853]]
    [[455050751207187]] [[455050831207179]] [[455050834540512]] [[455050824540513]]
    [[455050827873846]] [[455050837873845]] [[455050901207172]] [[455050904540505]]
    [[455050907873838]] [[455050911207171]] [[455050924540503]] [[455050981207164]]


    [[475038895872615]] [[475038899205948]] [[475038909205947]] [[475038902539281]]
    [[475038905872614]] [[475038979205940]] [[475038982539273]] [[475038975872607]]
    [[475038985872606]] [[475038989205939]] [[475039075872597]] [[475039065872598]]
    [[475039069205931]] [[475039072539264]] [[475039095872595]] [[475039162539255]]


    [[304918909614463]] [[304918916281129]] [[304918902947797]] [[304918896281131]]
    [[304918926281128]] [[304919052947782]] [[304919046281116]] [[304919069614447]]
    [[304919072947780]] [[304919059614448]] [[304919229614431]] [[304919239614430]]
    [[304919236281097]] [[304919242947763]] [[304919246281096]] [[304919382947749]]


    [[475082985868206]] [[475082992534872]] [[475082979201540]] [[475082982534873]]
    [[475082989201539]] [[475083052534866]] [[475083049201533]] [[475083059201532]]
    [[475083055868199]] [[475083062534865]] [[475083129201525]] [[475083142534857]]
    [[475083132534858]] [[475083135868191]] [[475083139201524]] [[475083202534851]]


    [[182743351862835]] [[182743338529503]] [[182743348529502]] [[182743345196169]] [[182743341862836]]
    [[182743431862827]] [[182743428529494]] [[182743425196161]] [[182743465196157]] [[182743458529491]]
    [[182743515196152]] [[182743511862819]] [[182743521862818]] [[182743518529485]] [[182743525196151]]
    [[182743585196145]] [[182743591862811]] [[182743595196144]] [[182743588529478]] [[182743598529477]]
    [[182743725196131]] [[182743715196132]] [[182743721862798]] [[182743711862799]] [[182743718529465]]


    [[492167650817322]] [[492167654150655]] [[492167657483988]] [[492167660817321]]
    [[492167647483989]] [[492167730817314]] [[492167734150647]] [[492167727483981]]
    [[492167724150648]] [[492167737483980]] [[492167814150639]] [[492167824150638]]
    [[492167817483972]] [[492167827483971]] [[492167830817304]] [[492167907483963]]


    [[487656364598289]] [[487656361264956]] [[487656357931623]] [[487656367931622]]
    [[487656371264955]] [[487656434598282]] [[487656427931616]] [[487656431264949]]
    [[487656441264948]] [[487656437931615]] [[487656521264940]] [[487656514598274]]
    [[487656511264941]] [[487656517931607]] [[487656524598273]] [[487656587931600]]


    enjoy facebook  @niranjan


    Facebook emoticons

    Posted at  Wednesday, November 07, 2012  |  in    |  Read More»

    Facebook emoticons  

    [[471830866191622]] [[471830859524956]] [[471830869524955]] [[471830872858288]]
    [[471830862858289]] [[471830939524948]] [[471830936191615]] [[471830942858281]]
    [[471830932858282]] [[471830946191614]] [[471831016191607]] [[471831006191608]]
    [[471831019524940]] [[471831012858274]] [[471831009524941]] [[471831079524934]]


    [[492107567489997]] [[492107560823331]] [[492107564156664]] [[492107557489998]]
    [[492107554156665]] [[492107640823323]] [[492107644156656]] [[492107630823324]]
    [[492107637489990]] [[492107634156657]] [[492107734156647]] [[492107724156648]]
    [[492107727489981]] [[492107737489980]] [[492107730823314]] [[492107804156640]]


    [[487653724598553]] [[487653721265220]] [[487653717931887]] [[487653731265219]]
    [[487653727931886]] [[487653791265213]] [[487653797931879]] [[487653801265212]]
    [[487653804598545]] [[487653794598546]] [[487653867931872]] [[487653874598538]]
    [[487653864598539]] [[487653861265206]] [[487653871265205]] [[487653931265199]]


    [[455109547867974]] [[455109554534640]] [[455109557867973]] [[455109551201307]]
    [[455109561201306]] [[455109631201299]] [[455109637867965]] [[455109641201298]]
    [[455109634534632]] [[455109644534631]] [[455109714534624]] [[455109727867956]]
    [[455109721201290]] [[455109724534623]] [[455109717867957]] [[455109791201283]]


    [[455050754540520]] [[455050761207186]] [[455050764540519]] [[455050757873853]]
    [[455050751207187]] [[455050831207179]] [[455050834540512]] [[455050824540513]]
    [[455050827873846]] [[455050837873845]] [[455050901207172]] [[455050904540505]]
    [[455050907873838]] [[455050911207171]] [[455050924540503]] [[455050981207164]]


    [[475038895872615]] [[475038899205948]] [[475038909205947]] [[475038902539281]]
    [[475038905872614]] [[475038979205940]] [[475038982539273]] [[475038975872607]]
    [[475038985872606]] [[475038989205939]] [[475039075872597]] [[475039065872598]]
    [[475039069205931]] [[475039072539264]] [[475039095872595]] [[475039162539255]]


    [[304918909614463]] [[304918916281129]] [[304918902947797]] [[304918896281131]]
    [[304918926281128]] [[304919052947782]] [[304919046281116]] [[304919069614447]]
    [[304919072947780]] [[304919059614448]] [[304919229614431]] [[304919239614430]]
    [[304919236281097]] [[304919242947763]] [[304919246281096]] [[304919382947749]]


    [[475082985868206]] [[475082992534872]] [[475082979201540]] [[475082982534873]]
    [[475082989201539]] [[475083052534866]] [[475083049201533]] [[475083059201532]]
    [[475083055868199]] [[475083062534865]] [[475083129201525]] [[475083142534857]]
    [[475083132534858]] [[475083135868191]] [[475083139201524]] [[475083202534851]]


    [[182743351862835]] [[182743338529503]] [[182743348529502]] [[182743345196169]] [[182743341862836]]
    [[182743431862827]] [[182743428529494]] [[182743425196161]] [[182743465196157]] [[182743458529491]]
    [[182743515196152]] [[182743511862819]] [[182743521862818]] [[182743518529485]] [[182743525196151]]
    [[182743585196145]] [[182743591862811]] [[182743595196144]] [[182743588529478]] [[182743598529477]]
    [[182743725196131]] [[182743715196132]] [[182743721862798]] [[182743711862799]] [[182743718529465]]


    [[492167650817322]] [[492167654150655]] [[492167657483988]] [[492167660817321]]
    [[492167647483989]] [[492167730817314]] [[492167734150647]] [[492167727483981]]
    [[492167724150648]] [[492167737483980]] [[492167814150639]] [[492167824150638]]
    [[492167817483972]] [[492167827483971]] [[492167830817304]] [[492167907483963]]


    [[487656364598289]] [[487656361264956]] [[487656357931623]] [[487656367931622]]
    [[487656371264955]] [[487656434598282]] [[487656427931616]] [[487656431264949]]
    [[487656441264948]] [[487656437931615]] [[487656521264940]] [[487656514598274]]
    [[487656511264941]] [[487656517931607]] [[487656524598273]] [[487656587931600]]


    enjoy facebook  @niranjan


    WINDOWS 8 RTM VERSIONS TORRENT DOWNLOAD LINKS AND ACTIVATION METHODS

    WINDOWS 8 ENTERPRISE 64 BIT:
    http://www.torrents.net/torrent/2502683/WINDOWS-8-ENTERPRISE-N-RTM-X64-VOLUME-ENGLISH-BOOT-DVD-[ThumperDC]/
    http://thepiratebay.se/torrent/7503952/MICROSOFT.WINDOWS.8.ENTERPRISE.RTM.X64.VOLUME.ENGLISH.DVD-WZT

    WINDOWS 8 ENTERPRISE 32 BIT:
    http://www.torrents.net/torrent/2510049/MICROSOFT.WINDOWS.8.ENTERPRISE.RTM.X86.VOLUME.ENGLISH.DVD-WZT/
    http://thepiratebay.se/torrent/7505762/MICROSOFT.WINDOWS.8.ENTERPRISE.RTM.X86.VOLUME.ENGLISH.DVD-WZT

    WINDOWS 8 PROFESSIONAL 32 BIT:
    http://thepiratebay.se/torrent/7506223/MICROSOFT.WINDOWS.8.PROFESSIONAL.RTM.X86.ENGLISH.DVD-WZT
    http://bitsnoop.com/microsoft-windows-8-professional-rt-q39417187.html

    WINDOWS 8 PROFESSIONAL 64 BIT:
    http://thepiratebay.se/torrent/7506213/MICROSOFT.WINDOWS.8.PROFESSIONAL.RTM.X64.ENGLISH.DVD-WZT
    http://bitsnoop.com/microsoft-windows-8-professional-rt-q39417238.html

    My personal sugestion GO FOR WINDOWS PROFESSIONAL 32 OR 64 BIT.(Enterprise only for buisness use)

    Retail keys:-

    Pro:
    NG4HW-VH26C-733KW-K6F98-J8CK4
    XKY4K-2NRWR-8F6P2-448RF-CRYQH

    Enterprise: 32JNW-9KQ84-P47T8-D8GGY-CWCK7

    Enterprise: JMNMF-RHW7P-DMY6X-RF3DR-X2BQT

    Note: The keys above are for installation only, you can't activate with them.

    ACTIVATIONS:

    If you want simple method to activate go direct to METHOD:3.

    METHOD:1 (USED BY ME)
    Activation for Windows 8 RTM PRO x64/x86 only (thro skype)

    1.Open CMD as Administrator and insert one of the following keys with command "slmgr -ipk <key>" (PRESS ENTER)
    Example: slmgr -ipk QGR4N-78PMD-KCRQ7-83BXT-YG667

    Key list:
    Give 1st priority:
    7JVN8-WVR92-87PVM-QM7P9-YDR92
    QGR4N-78PMD-KCRQ7-83BXT-YG667

    Give 2nd priority:
    J87JG-PXNR9-68BRP-DGJ9P-TMQHC
    7NKFG-64QDF-4PGMR-KP74B-VQR92
    CNVTB-YK4RV-M8C92-H633M-R6V3P
    NGTBT-FWPVK-WDFP9-G3GV8-W4YQP

    2.Then type command "slui 4" and choose United Kingdom as home country.

    3. In Skype call +448000188354 and lead the instructions. When you type all numers they gonna be checked and if key is not still blocked you will be asked On how many computers do you have installed windows. Type 1 as an answer. and enter the key given thro the call in the required place.

    note: above keys will work only for certain periods.

    METHOD:2(not verified personally by me).
    II.KMS METHOD:
    Open cmd as admin and type the following
    slmgr.vbs -ipk <KEY> (press enter)
    slmgr /skms 147.134.1.42:1688 (press enter)
    slmgr.vbs -ato

    THERE ARE MANY KMS ACTIVATION METHODS SPREAD OVER MANY SITES. GOOGLE FOR IT.

    METHOD:3(VERY SIMPLE ACTIVATOR FILE FOR ALL VERSIONS WORKS 100%)(but can personalise account pic, metro theme and lock screen with a seperate .exe file included in the torrent)

    http://www.torrentfunk.com/torrent/4792696/windows-8-activator-first-working-activator.html

    TORRENT CONTENTS:
    1. Microsoft Windows 8 Activator(All Edition).exe (use it to activate windows but windows doesnt allows to personalise account pic, metro theme and lock screen)
    2. OnThreeSeasPersonalization.exe (use to personalise account pic, metro theme and lock screen.)

    WINDOWS 8 FULL VERSION

    Posted at  Wednesday, November 07, 2012  |  in    |  Read More»


    WINDOWS 8 RTM VERSIONS TORRENT DOWNLOAD LINKS AND ACTIVATION METHODS

    WINDOWS 8 ENTERPRISE 64 BIT:
    http://www.torrents.net/torrent/2502683/WINDOWS-8-ENTERPRISE-N-RTM-X64-VOLUME-ENGLISH-BOOT-DVD-[ThumperDC]/
    http://thepiratebay.se/torrent/7503952/MICROSOFT.WINDOWS.8.ENTERPRISE.RTM.X64.VOLUME.ENGLISH.DVD-WZT

    WINDOWS 8 ENTERPRISE 32 BIT:
    http://www.torrents.net/torrent/2510049/MICROSOFT.WINDOWS.8.ENTERPRISE.RTM.X86.VOLUME.ENGLISH.DVD-WZT/
    http://thepiratebay.se/torrent/7505762/MICROSOFT.WINDOWS.8.ENTERPRISE.RTM.X86.VOLUME.ENGLISH.DVD-WZT

    WINDOWS 8 PROFESSIONAL 32 BIT:
    http://thepiratebay.se/torrent/7506223/MICROSOFT.WINDOWS.8.PROFESSIONAL.RTM.X86.ENGLISH.DVD-WZT
    http://bitsnoop.com/microsoft-windows-8-professional-rt-q39417187.html

    WINDOWS 8 PROFESSIONAL 64 BIT:
    http://thepiratebay.se/torrent/7506213/MICROSOFT.WINDOWS.8.PROFESSIONAL.RTM.X64.ENGLISH.DVD-WZT
    http://bitsnoop.com/microsoft-windows-8-professional-rt-q39417238.html

    My personal sugestion GO FOR WINDOWS PROFESSIONAL 32 OR 64 BIT.(Enterprise only for buisness use)

    Retail keys:-

    Pro:
    NG4HW-VH26C-733KW-K6F98-J8CK4
    XKY4K-2NRWR-8F6P2-448RF-CRYQH

    Enterprise: 32JNW-9KQ84-P47T8-D8GGY-CWCK7

    Enterprise: JMNMF-RHW7P-DMY6X-RF3DR-X2BQT

    Note: The keys above are for installation only, you can't activate with them.

    ACTIVATIONS:

    If you want simple method to activate go direct to METHOD:3.

    METHOD:1 (USED BY ME)
    Activation for Windows 8 RTM PRO x64/x86 only (thro skype)

    1.Open CMD as Administrator and insert one of the following keys with command "slmgr -ipk <key>" (PRESS ENTER)
    Example: slmgr -ipk QGR4N-78PMD-KCRQ7-83BXT-YG667

    Key list:
    Give 1st priority:
    7JVN8-WVR92-87PVM-QM7P9-YDR92
    QGR4N-78PMD-KCRQ7-83BXT-YG667

    Give 2nd priority:
    J87JG-PXNR9-68BRP-DGJ9P-TMQHC
    7NKFG-64QDF-4PGMR-KP74B-VQR92
    CNVTB-YK4RV-M8C92-H633M-R6V3P
    NGTBT-FWPVK-WDFP9-G3GV8-W4YQP

    2.Then type command "slui 4" and choose United Kingdom as home country.

    3. In Skype call +448000188354 and lead the instructions. When you type all numers they gonna be checked and if key is not still blocked you will be asked On how many computers do you have installed windows. Type 1 as an answer. and enter the key given thro the call in the required place.

    note: above keys will work only for certain periods.

    METHOD:2(not verified personally by me).
    II.KMS METHOD:
    Open cmd as admin and type the following
    slmgr.vbs -ipk <KEY> (press enter)
    slmgr /skms 147.134.1.42:1688 (press enter)
    slmgr.vbs -ato

    THERE ARE MANY KMS ACTIVATION METHODS SPREAD OVER MANY SITES. GOOGLE FOR IT.

    METHOD:3(VERY SIMPLE ACTIVATOR FILE FOR ALL VERSIONS WORKS 100%)(but can personalise account pic, metro theme and lock screen with a seperate .exe file included in the torrent)

    http://www.torrentfunk.com/torrent/4792696/windows-8-activator-first-working-activator.html

    TORRENT CONTENTS:
    1. Microsoft Windows 8 Activator(All Edition).exe (use it to activate windows but windows doesnt allows to personalise account pic, metro theme and lock screen)
    2. OnThreeSeasPersonalization.exe (use to personalise account pic, metro theme and lock screen.)

    Sunday, 14 October 2012

    TuneUp 2012   serial keys

    BFX1CW-VJ06BH-903WPW-RVE93Q-F665H1-2DB4KR
     NMTE3N-2NDWV1-VHNXTC-8J1M5Y-ACKK3B-X9NEPN
     D1M00E-5WVRYW-XARE1N-KP5B0W-3HNFD1-M3VJDF
     3X06EA-PQP5WC-4PEAK2-ERC1B5-ERC1TH-5M6QM1
    1NMB7C-6EJAX6-7Y98YF-FWHHE4-25XJ3X-52XTRK
     0DK02D-9YYXQW-WQ2373-VN4MFW-P11HR4-T4JDW4
     J600NN-7B92R2-9F009D-V7F5B4-AKDYT2-NFBK07
     A47C74-0F1RJT-HMAV2D-M0QR0N-KCM3NB-QQ7W1K
     NHCYFT-4BPQND-1JTHHR-3QDM5X-9BFV3W-Y0Y18K
     PY6R3R-D69TQ2-FHBEYQ-5BK0BQ-YF73T0-29TYVW
     K3PDK5-B2BD0H-1TAW3V-314QY8-MKTNXY-1YQ2HV
     WMN2PX-P3CYJH-4TKJPJ-FBRAR6-VJWJK8-D3XNF6
     0BP730-B3KDKB-Y1CYAV-EJAR9X-QMEPDM-2DQFMP
     TXAXX9-836Y9T-QAAY66-5DWFRK-B1V3HR-WRAMYR
     8NMP3K-THE96F-XXD92Y-PTY9D5-H0CQ2M-YJ55TX
    0FNME5-QJF111-82PXA1-Q293YK-5D0Y2V-VKM381
     YBECPV-QJQ048-B853BV-HXWQX4-DT1JAP-6HHK18
     03HH2H-ABM842-ME9K3R-5V596V-2MAAY3-4KDA0M
    7NR27W-3450WP-KQD6X4-W3AD33-3B2K2Q-3NRHDF
     PQE405-W5P3MD-83HEPC-6YNYY5-E2F4FK-8H62M7
     2HQ50N-V5F6YD-62D4XP-AY0QWP-1B141A-FQXDW8
     4NVWEN-T4K7WY-0476YB-1A91MD-6JHEF8-B7YJWA
     HFXKJY-536MQ0-R70F7Q-66A3T9-JJ7WX7-7HACRM
     KACPC5-3TQ7DW-QHEDFJ-QNMQ

    @enjoy hacking    niranjan

    TuneUp 2012 serial keys

    Posted at  Sunday, October 14, 2012  |  in    |  Read More»

    TuneUp 2012   serial keys

    BFX1CW-VJ06BH-903WPW-RVE93Q-F665H1-2DB4KR
     NMTE3N-2NDWV1-VHNXTC-8J1M5Y-ACKK3B-X9NEPN
     D1M00E-5WVRYW-XARE1N-KP5B0W-3HNFD1-M3VJDF
     3X06EA-PQP5WC-4PEAK2-ERC1B5-ERC1TH-5M6QM1
    1NMB7C-6EJAX6-7Y98YF-FWHHE4-25XJ3X-52XTRK
     0DK02D-9YYXQW-WQ2373-VN4MFW-P11HR4-T4JDW4
     J600NN-7B92R2-9F009D-V7F5B4-AKDYT2-NFBK07
     A47C74-0F1RJT-HMAV2D-M0QR0N-KCM3NB-QQ7W1K
     NHCYFT-4BPQND-1JTHHR-3QDM5X-9BFV3W-Y0Y18K
     PY6R3R-D69TQ2-FHBEYQ-5BK0BQ-YF73T0-29TYVW
     K3PDK5-B2BD0H-1TAW3V-314QY8-MKTNXY-1YQ2HV
     WMN2PX-P3CYJH-4TKJPJ-FBRAR6-VJWJK8-D3XNF6
     0BP730-B3KDKB-Y1CYAV-EJAR9X-QMEPDM-2DQFMP
     TXAXX9-836Y9T-QAAY66-5DWFRK-B1V3HR-WRAMYR
     8NMP3K-THE96F-XXD92Y-PTY9D5-H0CQ2M-YJ55TX
    0FNME5-QJF111-82PXA1-Q293YK-5D0Y2V-VKM381
     YBECPV-QJQ048-B853BV-HXWQX4-DT1JAP-6HHK18
     03HH2H-ABM842-ME9K3R-5V596V-2MAAY3-4KDA0M
    7NR27W-3450WP-KQD6X4-W3AD33-3B2K2Q-3NRHDF
     PQE405-W5P3MD-83HEPC-6YNYY5-E2F4FK-8H62M7
     2HQ50N-V5F6YD-62D4XP-AY0QWP-1B141A-FQXDW8
     4NVWEN-T4K7WY-0476YB-1A91MD-6JHEF8-B7YJWA
     HFXKJY-536MQ0-R70F7Q-66A3T9-JJ7WX7-7HACRM
     KACPC5-3TQ7DW-QHEDFJ-QNMQ

    @enjoy hacking    niranjan

    Tuesday, 9 October 2012

    windows cmd short keys
    downlode
    http://www.mediafire.com/view/?hkt0zy79ti6i517

    windows cmd short keys downlode

    Posted at  Tuesday, October 09, 2012  |  in    |  Read More»

    windows cmd short keys
    downlode
    http://www.mediafire.com/view/?hkt0zy79ti6i517

    Friday, 5 October 2012


    Anyone who has been using Windows for any length of time knows reinstalling it is unavoidable. Some people call technical help and some do it themselves. If you reinstall on your own, you know it takes a little time but the most annoying part of reinstalling Windows is that you have to reinstall all your software one by one all over again. Software like Firefox, Winamp, VLC and other indispensable programs that don’t ship with Windows.
    Windows Post-Install Wizard allows you to take care of such situations and automatically install all the software that you would like to install on a fresh install with a minimum of input. There are a few steps involved in getting it to work as we shall see:
    • Download and extract the package to a location of your choice.
    • Let’s start by adding the applications you need to be installed, post-Windows installation. You must download the applications and save the setup inside the “WPI\Install” folder which can be found under the location where you extracted the contents of the download from step 1.
    • Now run the WPI.hta file. This will launch a HTML application. Click on the config button to enter the configuration section. This is where we will build the script to install all the software that we require, automatically.
    • Click on the ‘add’ button and fill in the appropriate details in the ‘Description’ tag at the bottom. Enter the name, description and install order. UUID gets filled automatically, choose “Default” if you want the current application to be included in the default set of apps available during installation. Choose a category under which the current application should appear, should the user want to choose the applications to install.
    • Now hop over to the command tab. Click on the “Add” button towards the right. A command section appears at the bottom. Click on the folder icon to browse for the setup file. This will fill in the command section automatically with the required path. Now you need to add any switches that you want to run the installation program with. A common switch used in slipstreamed or unintended installs is the /s or /silent or -quiet switch. This suppresses all questions and proceeds with the default install of the application. You might have to search for the switches available for the particular application that you are working with!
    • Add in any dependencies, in the ‘Dependencies’ tab. A common example is software that requires the .NET framework. In such cases you would not want to install software that depends on the .NET framework to be installed without the user checking the .NET framework entry first. Such conditions can be specified from within this tab.
    • Select ‘Save’, add other applications or choose ‘exit’.
    Now that you have configured your script, next comes the task to include it on your Windows installation disc or as a standalone disc that you can run during the installation of the post installation after booting on to the desktop. WPI has plenty of options to help you achieve this, best of which (because its ready made) is the $oem$ folder that you can download from the WPI site and place it on your installation disc. This is the structure we are looking to achieve on your final installation disc:
    With this done, use something like nlite, vlite or the MakeISO tool that you can download from the WPI download section to make the disc bootable. Pop it in and sit back and watch your system being configured according to your needs. WPI also offers advanced options you can use to customize the look of the installer and even playback some music while it’s doing its thing!
    Since you can run almost any command using WPI, it is also an excellent way to apply some tweaks that you had before formatting and you would like to include in the next install. It is always a good option to check your newly created disc on a virtual machine before you try to go all ballistic and format your computer. You might be able to find a quirk or two and fix them.

    How to Autoinstall Required Software after a Windows Reinstall

    Posted at  Friday, October 05, 2012  |  in    |  Read More»


    Anyone who has been using Windows for any length of time knows reinstalling it is unavoidable. Some people call technical help and some do it themselves. If you reinstall on your own, you know it takes a little time but the most annoying part of reinstalling Windows is that you have to reinstall all your software one by one all over again. Software like Firefox, Winamp, VLC and other indispensable programs that don’t ship with Windows.
    Windows Post-Install Wizard allows you to take care of such situations and automatically install all the software that you would like to install on a fresh install with a minimum of input. There are a few steps involved in getting it to work as we shall see:
    • Download and extract the package to a location of your choice.
    • Let’s start by adding the applications you need to be installed, post-Windows installation. You must download the applications and save the setup inside the “WPI\Install” folder which can be found under the location where you extracted the contents of the download from step 1.
    • Now run the WPI.hta file. This will launch a HTML application. Click on the config button to enter the configuration section. This is where we will build the script to install all the software that we require, automatically.
    • Click on the ‘add’ button and fill in the appropriate details in the ‘Description’ tag at the bottom. Enter the name, description and install order. UUID gets filled automatically, choose “Default” if you want the current application to be included in the default set of apps available during installation. Choose a category under which the current application should appear, should the user want to choose the applications to install.
    • Now hop over to the command tab. Click on the “Add” button towards the right. A command section appears at the bottom. Click on the folder icon to browse for the setup file. This will fill in the command section automatically with the required path. Now you need to add any switches that you want to run the installation program with. A common switch used in slipstreamed or unintended installs is the /s or /silent or -quiet switch. This suppresses all questions and proceeds with the default install of the application. You might have to search for the switches available for the particular application that you are working with!
    • Add in any dependencies, in the ‘Dependencies’ tab. A common example is software that requires the .NET framework. In such cases you would not want to install software that depends on the .NET framework to be installed without the user checking the .NET framework entry first. Such conditions can be specified from within this tab.
    • Select ‘Save’, add other applications or choose ‘exit’.
    Now that you have configured your script, next comes the task to include it on your Windows installation disc or as a standalone disc that you can run during the installation of the post installation after booting on to the desktop. WPI has plenty of options to help you achieve this, best of which (because its ready made) is the $oem$ folder that you can download from the WPI site and place it on your installation disc. This is the structure we are looking to achieve on your final installation disc:
    With this done, use something like nlite, vlite or the MakeISO tool that you can download from the WPI download section to make the disc bootable. Pop it in and sit back and watch your system being configured according to your needs. WPI also offers advanced options you can use to customize the look of the installer and even playback some music while it’s doing its thing!
    Since you can run almost any command using WPI, it is also an excellent way to apply some tweaks that you had before formatting and you would like to include in the next install. It is always a good option to check your newly created disc on a virtual machine before you try to go all ballistic and format your computer. You might be able to find a quirk or two and fix them.

    Monday, 1 October 2012


    How to customize Windows XP Login.Windows 7, on the other hand, has the ability to change the logon screen built into it. Well sort of, the functionality exists to make it easy for OEMs to include their custom branding, but nothing stops you to take advantage of it. In this article we shall first look into how you can change the logon screen manually and then we will point you towards some tools that make the job easier and add even more feature rich. So let’s get started.

    Manually

    Its is always nice to know how things work behind the scenes, what better way to do so then try them out yourself. To change the logon screen manually follow these steps:
    1. Fire up registry editor (Win Key + R and then type regedit, hit enter)
    2. Browse to
      HKY LOCAL MACHINE /Software/Microsoft/Windows/CurrentVersion/Authentication/
      LogonUI/Background
      , double click on key named OEMBackground and change its value to 1 (If you cannot find the path or the key go ahead and create it, remember OEMBackground is a Dword)
    3. You just enabled the OEM Background functionality. Now browse to the folder
      %windir%system32oobeinfobackgrounds
      within Windows explorer. %windir% refers to your Windows install directory
      C:Windows
      in most systems. Again the folder path may not exist already, so you can go ahead and create required folders (info and backgrounds are generally not present)
    4. Now put in any JPG file with size less than 256 kb in this folder and rename it to backgroundDefault.jpg. This file will be stretched to fit the screen, so you would want it to match the resolution of your screen so that image doesn’t look bad. You can something like smush.it or Photoshop’s Save as/Save for Web feature to reduce image size.

    Using Tools

    Check out Logon Changer from Tweaks.com , that lets you choose a image file to use as your logon background. That all what you do, just choose an image and Logon Changer will take care of everything else including the file size limit. It also makes it super easy to revert back to the default Logon Screen.
    Windows 7 Logon Screen Rotator  – takes the logon screen customization one step further by allowing you to select a set of images. It will then randomly use one of these images as the logon screen.
    There you have it. Using any of the above method you can easily change Windows 7 logon screen to any wallpaper of your choice or that witty one liner graphic you created yourself or perhaps even one of your photos as long as they meet the requirements. Let us know your experience of using these methods and we would love to see what you have as your logon screen. Mention them in comments!

    How To Change Windows 7 Logon Screen with reg

    Posted at  Monday, October 01, 2012  |  in    |  Read More»


    How to customize Windows XP Login.Windows 7, on the other hand, has the ability to change the logon screen built into it. Well sort of, the functionality exists to make it easy for OEMs to include their custom branding, but nothing stops you to take advantage of it. In this article we shall first look into how you can change the logon screen manually and then we will point you towards some tools that make the job easier and add even more feature rich. So let’s get started.

    Manually

    Its is always nice to know how things work behind the scenes, what better way to do so then try them out yourself. To change the logon screen manually follow these steps:
    1. Fire up registry editor (Win Key + R and then type regedit, hit enter)
    2. Browse to
      HKY LOCAL MACHINE /Software/Microsoft/Windows/CurrentVersion/Authentication/
      LogonUI/Background
      , double click on key named OEMBackground and change its value to 1 (If you cannot find the path or the key go ahead and create it, remember OEMBackground is a Dword)
    3. You just enabled the OEM Background functionality. Now browse to the folder
      %windir%system32oobeinfobackgrounds
      within Windows explorer. %windir% refers to your Windows install directory
      C:Windows
      in most systems. Again the folder path may not exist already, so you can go ahead and create required folders (info and backgrounds are generally not present)
    4. Now put in any JPG file with size less than 256 kb in this folder and rename it to backgroundDefault.jpg. This file will be stretched to fit the screen, so you would want it to match the resolution of your screen so that image doesn’t look bad. You can something like smush.it or Photoshop’s Save as/Save for Web feature to reduce image size.

    Using Tools

    Check out Logon Changer from Tweaks.com , that lets you choose a image file to use as your logon background. That all what you do, just choose an image and Logon Changer will take care of everything else including the file size limit. It also makes it super easy to revert back to the default Logon Screen.
    Windows 7 Logon Screen Rotator  – takes the logon screen customization one step further by allowing you to select a set of images. It will then randomly use one of these images as the logon screen.
    There you have it. Using any of the above method you can easily change Windows 7 logon screen to any wallpaper of your choice or that witty one liner graphic you created yourself or perhaps even one of your photos as long as they meet the requirements. Let us know your experience of using these methods and we would love to see what you have as your logon screen. Mention them in comments!

    Wednesday, 19 September 2012

    Windows 7 advanced sharing settings not staying
    In Windows 7, I can't get my advanced sharing settings to stick. If I change something in the Home profile, the Public profile might change along with it, or it just won't stick at all.
    This image has been resized. Click this bar to view the full image. The original image is sized 1511x636.


    Hey guys,


    I had the same problem. Here's what I did:

    1. Run services.msc

    2. Turn on SSDP and UPnP Device Host

    3. Go back to Network/Sharing Center and click on "On" on Network Discovery and hit "Apply"

    4. This time it should stay "On"

    Windows 7 advanced sharing settings not staying

    Posted at  Wednesday, September 19, 2012  |  in    |  Read More»

    Windows 7 advanced sharing settings not staying
    In Windows 7, I can't get my advanced sharing settings to stick. If I change something in the Home profile, the Public profile might change along with it, or it just won't stick at all.
    This image has been resized. Click this bar to view the full image. The original image is sized 1511x636.


    Hey guys,


    I had the same problem. Here's what I did:

    1. Run services.msc

    2. Turn on SSDP and UPnP Device Host

    3. Go back to Network/Sharing Center and click on "On" on Network Discovery and hit "Apply"

    4. This time it should stay "On"

    Sunday, 9 September 2012

    fake mail websites

    Posted at  Sunday, September 09, 2012  |  in  HACKING  |  Read More»


    Internet Download Manager Full Activation| IDM Crack Tool Without Serial,Patch

    Idm With Crack
    Internet download manager  is a tool to increase downloadspeed of your files like videos ,mp3 music files or any other files.
    In this post we are going to explain you about how to do activation of IDM crack tool for life time with out any serial Key and Patches.We  introduced this because many of the patches don't work they may create viruses when you install it into your the personal Computer. So try this tool for faster and safer downloads.This is 100% working trick, go ahead with the simple steps below in this tutorial.

    Features of this download Manager:

    • Option to control the downloads like resume ,schedule.
    • Incomplete downloads will be resumed automatically and you can download it next time from where the download is resumed / interrupted.
    • All premium features for free available in this tool.
    Follow The Instructions Below :-

    Step 1:- Install any old or current version of IDM.


    Download IDM NewVersion
    click the below link :-


              Internet Download Manager 

    Step 2 :- Then open  the "IDM crack for life.exe" file .

    Download IDM crack for life.exe by the below link

    Download Link :- "IDM crack file for life.exe".

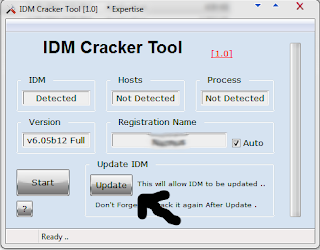
    Step 3 :- Click on the Update Option as shown in the Image Below.


    Idm With Crack

    Step 4 :- Go to IDM > Help > Check for Update & update the software.


    Idm With Crack

    Step 5 :- Open IDM crack for life.exe again and click "Start" to make the new updated IDM full version as shown in the Image below.


    After completing all steps click the Help option and in that
    click the About IDM option.Now it is activated as full version.Image is shown below.
    Idm With Crack

    Note :- 
    After Activating This Trick Never Update The IDM software.This is 100% working Trick,if any problems feel free to put comments here.

    Internet Download Manager Full Activation| IDM Crack Tool Without Serial,Patch

    Posted at  Sunday, September 09, 2012  |  in  HACKING  |  Read More»


    Internet Download Manager Full Activation| IDM Crack Tool Without Serial,Patch

    Idm With Crack
    Internet download manager  is a tool to increase downloadspeed of your files like videos ,mp3 music files or any other files.
    In this post we are going to explain you about how to do activation of IDM crack tool for life time with out any serial Key and Patches.We  introduced this because many of the patches don't work they may create viruses when you install it into your the personal Computer. So try this tool for faster and safer downloads.This is 100% working trick, go ahead with the simple steps below in this tutorial.

    Features of this download Manager:

    • Option to control the downloads like resume ,schedule.
    • Incomplete downloads will be resumed automatically and you can download it next time from where the download is resumed / interrupted.
    • All premium features for free available in this tool.
    Follow The Instructions Below :-

    Step 1:- Install any old or current version of IDM.


    Download IDM NewVersion
    click the below link :-


              Internet Download Manager 

    Step 2 :- Then open  the "IDM crack for life.exe" file .

    Download IDM crack for life.exe by the below link

    Download Link :- "IDM crack file for life.exe".

    Step 3 :- Click on the Update Option as shown in the Image Below.


    Idm With Crack

    Step 4 :- Go to IDM > Help > Check for Update & update the software.


    Idm With Crack

    Step 5 :- Open IDM crack for life.exe again and click "Start" to make the new updated IDM full version as shown in the Image below.


    After completing all steps click the Help option and in that
    click the About IDM option.Now it is activated as full version.Image is shown below.
    Idm With Crack

    Note :- 
    After Activating This Trick Never Update The IDM software.This is 100% working Trick,if any problems feel free to put comments here.

    Wednesday, 25 July 2012


    Windows Tip: Shutdown Your Computer With The Command Prompt

    How To:

    Open the command prompt: Windows Key + R then type the command below and hit OK:
    cmd
    This will open the command prompt. Now we can play!
    Note: You could type the shutdown command directly into the Run dialog. I don’t advise this. If there is a typo or error, you won’t know. There is no information given!

    Shutdown Local Machine

    This only takes a couple of keystrokes. Type the code below and hit OK:
    shutdown -s
    “shutdown” tells the computer what command we want to execute and the “-s” switch tells it what to do, which is to shutdown!

    Specify Time

    shutdown -s -t 60
    Now we have added the “-t” switch and a variable, which in this case is “60″. This number is the number of seconds before the computer is shutdown. A dialog will open and display a count down timer!

    Give Us Some Info!

    shutdown -s -t 120 -c "You better finish, because I shut you down foo!"
    The “-c” switch will allow you to give the user some information for the reason of the shutdown.

    Shutdown A Remote Computer

    shutdown -s -m \\desktop -t 45
    I really like this one! The “-m” switch will allow you to shutdown a remote machine, in this case, a computer named “desktop”. For this to work, you must have administrative access to the computer! To see of you do, hit Windows Key + R then type the computer’s name, i.e.:
    \\desktop
    If you can connect to it, you will be asked to log into the machine with a user name and password. Once confirmed, a window will open displaying the directories available to you. Now you know you can shut it down remotely.

    Cancel Shutdown

    Let’s say that you need to cancel a shutdown in progress. Go to the computer in question, hit Windows Key + R then type command below:
    shutdown -a
    This will abort the shutdown, assuming there is a counter and it hasn’t reached zero yet!

    Windows Tip: Shutdown Your Computer With The Command Prompt

    Posted at  Wednesday, July 25, 2012  |  in  CMD  |  Read More»


    Windows Tip: Shutdown Your Computer With The Command Prompt

    How To:

    Open the command prompt: Windows Key + R then type the command below and hit OK:
    cmd
    This will open the command prompt. Now we can play!
    Note: You could type the shutdown command directly into the Run dialog. I don’t advise this. If there is a typo or error, you won’t know. There is no information given!

    Shutdown Local Machine

    This only takes a couple of keystrokes. Type the code below and hit OK:
    shutdown -s
    “shutdown” tells the computer what command we want to execute and the “-s” switch tells it what to do, which is to shutdown!

    Specify Time

    shutdown -s -t 60
    Now we have added the “-t” switch and a variable, which in this case is “60″. This number is the number of seconds before the computer is shutdown. A dialog will open and display a count down timer!

    Give Us Some Info!

    shutdown -s -t 120 -c "You better finish, because I shut you down foo!"
    The “-c” switch will allow you to give the user some information for the reason of the shutdown.

    Shutdown A Remote Computer

    shutdown -s -m \\desktop -t 45
    I really like this one! The “-m” switch will allow you to shutdown a remote machine, in this case, a computer named “desktop”. For this to work, you must have administrative access to the computer! To see of you do, hit Windows Key + R then type the computer’s name, i.e.:
    \\desktop
    If you can connect to it, you will be asked to log into the machine with a user name and password. Once confirmed, a window will open displaying the directories available to you. Now you know you can shut it down remotely.

    Cancel Shutdown

    Let’s say that you need to cancel a shutdown in progress. Go to the computer in question, hit Windows Key + R then type command below:
    shutdown -a
    This will abort the shutdown, assuming there is a counter and it hasn’t reached zero yet!

    About-Privacy Policy-Contact us
    Copyright © 2013 infinityCEH. Blogger Template by Bloggertheme9
    Proudly Powered by Blogger.
    back to top